Hello Everyone!
Today
as promised, I will be talking about how to create a quiz within Edmodo that
your students can take after they had entered your class "group." In
order to create a quiz you will need to follow an easy five step process. The
Edmodo site itself lays out this process so it is very user-friendly. I have
provided pictures of each step along with all of the possibilities that this
site provides.
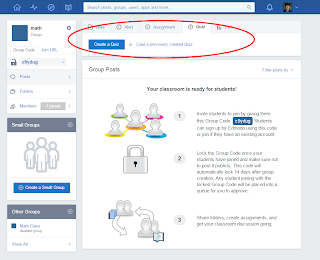
 The first step of this process is to enter your Edmodo
page, and click on the "group" that you had created for your class.
In my situation, I used the demonstration group of Math. At the top of the page
when you entered your group, you will notice a tab which says "Quiz."
If you click on this tab a small box will pop up asking if you want to create
or load a quiz. Click on "Create a Quiz"
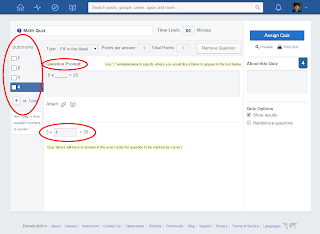
 A new page will open providing you will a selection
of choices to begin the creation of your quiz format.
You can begin by creating
a name, and time length that your students will have to complete the quiz, as
well as what type of quiz you will be hosting, from a drop-down menu. The options
that are available to you are: "multiple choice, fill in the blank, true
or false, short answer and matching." Once you had decided on what type of
question your first one will be click on "+ Add First Question. " ***Note that you can have several different
question types, you do not have to have only one option. I will explain more
below***
 Step three is where you will be able to create
your questions at the top of the screen you will see several drop-down menus
stating that you can use several different types of questions within your quiz.
You can also change the point value! When creating the quiz question, you will
have to place what the question is, into the question prompt box. Below that
box is a secondary box to place the answer. ***As a side note the multiple
choice option will require you to place several answers for a student to choose
from.*** Once you finish each question click on the "Assign Quiz"
button at the top right corner.
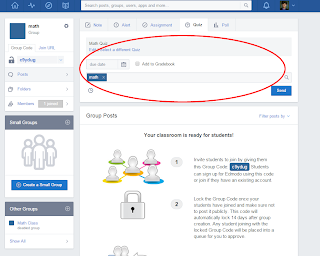
  You will be brought back to your group page, where
you will then have to click on the "Quiz" tab again. When you do,
this time you should click on the "load a quiz" link and choose your
newly formed quiz from the selections, and hit "send."
The final step for this process is to wait for
your students to complete the quiz. You can view their progression and
additional statistics from this page as well by clicking on the "turned
in" button.
I hope you all enjoyed making a quiz! They can be
easily reused by having the questions changed around from the quiz settings, an
easy change when you click into the quiz. If you have any questions or comments
about adding a quiz to your groups, please do not hesitate to ask!
Have a great rest of the week!
Alex

Great feature!
ReplyDeleteThis will help teacher saving the time spent to grade students paper quiz and use the time for a more creative planning!
Thank you!