Friday, November 21, 2014

Using Edmodo to Create a Poll

Hi Everyone!

            This week will be a shorter post, however focused on a very useful tool within Edmodo. Below I have the step-by-step process with supplemental pictures of how to create a poll for your students to take in order to give you an idea of where your students are at, what to re-teach or where to move on to within a classroom setting. Polls in the classroom can be very useful for both students and teachers. They provide a quick tally of student opinions, thoughts or feelings about a specific topic and share them with one another. The teacher can use this information in order to re-teach information that they thought students did not get right away, or if the students feel very competent with the current information to allow the class to skip ahead and learn new content.  

Creating a poll is an easy four-step process. Step one is to click on the "poll" tab at the top of any page on the Edmodo site. A drop-down menu will appear allowing you to type in a question.


Once you do so the second step is to create a selection of answers that the students can choose from that will answer the question and help you as the teacher determine where to go next. You can post as many possible answers as you need. I used four answers as an example.


The next step is to choose who to send this poll to. You can send it to individual students, other teachers, or even whole class groups that you had created previously. Once you click on the groups or other contacts that you want to share with, click on the "send" button.


The final step is to open the page that you have your poll posted, to ensure that every question and answer is visible. Then you wait for your responses and view your results for future planning.


Good luck creating your own polls this week! I think this is a very fun and useful tool for a growing online classroom. As always please feel free to ask any questions or leave comments as you like.

Talk to you all next week!

Alex 


Thursday, November 13, 2014

Using Edmodo to Create a Quiz

Hello Everyone!

            Today as promised, I will be talking about how to create a quiz within Edmodo that your students can take after they had entered your class "group." In order to create a quiz you will need to follow an easy five step process. The Edmodo site itself lays out this process so it is very user-friendly. I have provided pictures of each step along with all of the possibilities that this site provides.

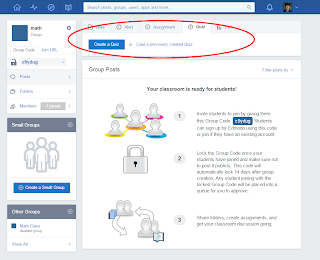
The first step of this process is to enter your Edmodo page, and click on the "group" that you had created for your class. In my situation, I used the demonstration group of Math. At the top of the page when you entered your group, you will notice a tab which says "Quiz." If you click on this tab a small box will pop up asking if you want to create or load a quiz. Click on "Create a Quiz"


A new page will open providing you will a selection of choices to begin the creation of your quiz format.
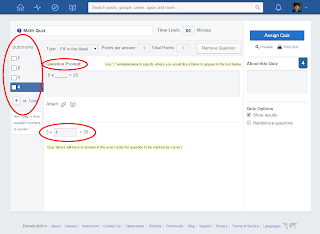
You can begin by creating a name, and time length that your students will have to complete the quiz, as well as what type of quiz you will be hosting, from a drop-down menu. The options that are available to you are: "multiple choice, fill in the blank, true or false, short answer and matching." Once you had decided on what type of question your first one will be click on "+ Add First Question. "  ***Note that you can have several different question types, you do not have to have only one option. I will explain more below***


Step three is where you will be able to create your questions at the top of the screen you will see several drop-down menus stating that you can use several different types of questions within your quiz. You can also change the point value! When creating the quiz question, you will have to place what the question is, into the question prompt box. Below that box is a secondary box to place the answer. ***As a side note the multiple choice option will require you to place several answers for a student to choose from.*** Once you finish each question click on the "Assign Quiz" button at the top right corner.

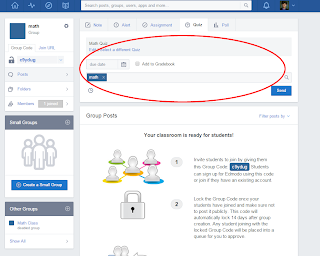
You will be brought back to your group page, where you will then have to click on the "Quiz" tab again. When you do, this time you should click on the "load a quiz" link and choose your newly formed quiz from the selections, and hit "send."


The final step for this process is to wait for your students to complete the quiz. You can view their progression and additional statistics from this page as well by clicking on the "turned in" button.

I hope you all enjoyed making a quiz! They can be easily reused by having the questions changed around from the quiz settings, an easy change when you click into the quiz. If you have any questions or comments about adding a quiz to your groups, please do not hesitate to ask!

Have a great rest of the week!

Alex


Thursday, November 6, 2014

Creating a Group - Edmodo

Hi Everyone!

            This week as I had mentioned I would be focusing on how to create a group in Edmodo. Let me first explain what a "group" means in Edmodo. What this term means is that you will have the ability to create an area designed specifically for a subject, where your students can join in order to get documents, as questions, take quizzes and more!

This process can be completed in about for short steps, similar to that of the log in. The first step to create a group for your class is to click on the add group link on the left-hand side of the page. A small window will pop up that will ask you to type in your group name, grade range, subject area, and the specific content that will be taught in that subject area.


The next step is to create a group size, this is the number of students that will be in your class, along with a description to explain what the group is about. This will also make the group easier for your students to find and add later on when they are prompted.

Once you have clicked on the "finish" button the group page will open, providing you with a group code that you will have to provide to your students in order to join your group.

Now that you have a group created, for your class you can utilize its tools in order to enhance your students' e-learning experience. Beginning with the use of communication, the group tool allows you the teacher or any of the students within the group to ask questions or make comments on the group's main page. This commenting tool allows for additional asynchronous communication between student to teacher, and students to student, after they had left the classroom. Additional tools as I had mentioned above consist of polling and quizzes that the students can take online in a location that might be more comfortable for them on their own time after school hours. 
This is also a good way to collect data from students, since all of the polling and quizzes are online, all of the information can be easily organized for later use. I will discuss more quizzes and polling tools later on during this blogging experience. Leave a comment below if you have any questions or problems when creating a group.

Have a great rest of the week all!

Alex