Friday, December 5, 2014

Using Edmodo to Create - Notes, Alerts and Assignments

Hello Everyone,

            This week will be a shorter week as I provide a collection of the remaining main tools that are available through the use of Edmodo. The three remaining components that I will be discussing are the use of posting notes, alerts and assignments. Posting notes are the easiest to complete of the three. There are three short steps that I have combined into a few sentences that will explain how to create and send one.  


Click on the "note" tab at the top of the page, and type in your note in the first drop-down box. Then choose the group or selection of students/teachers you wish to share the note with and determine if you want to post a hyperlink, document, library or scheduled time and hit the "send" button.


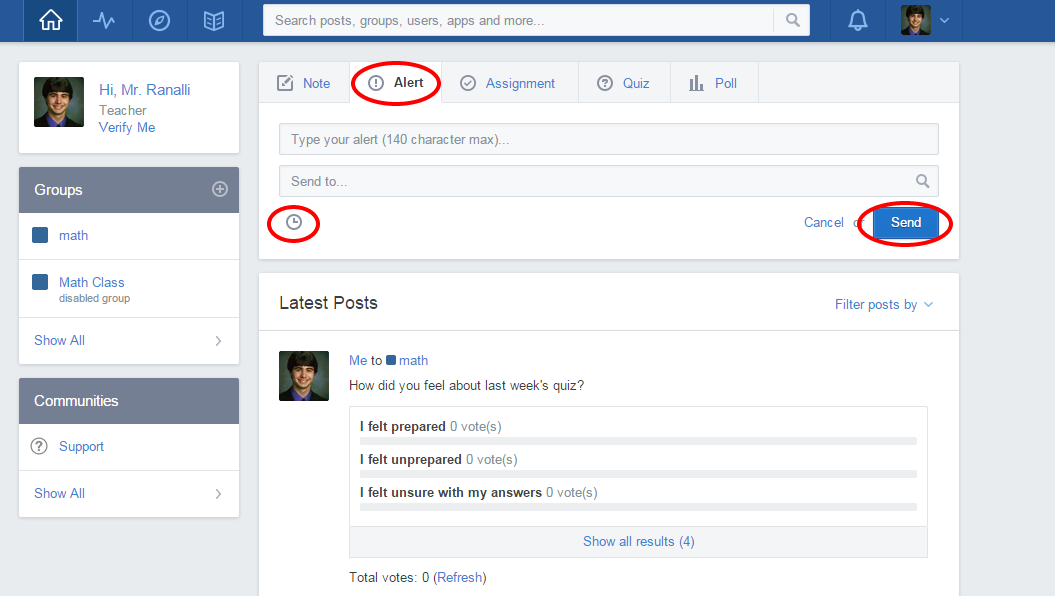
The alert tool allows the teacher to send a message to a collection of people similar to a note. The difference between these two tools is that the alert function remains highlighted or towards the top of the news feed, so all of the selected viewers can see the alert as soon as they log on. A note once posted can be masked by other postings, and therefore harder for a viewer to find and see it within the news feed. In order to create an alert you must first click on the "alert" tab at the top of the page, fill in the message you wish to highlight, and who you would like to send the alert to. The final two steps are to place a scheduled time you wish to post the alert and then click on the "send" button to post it.

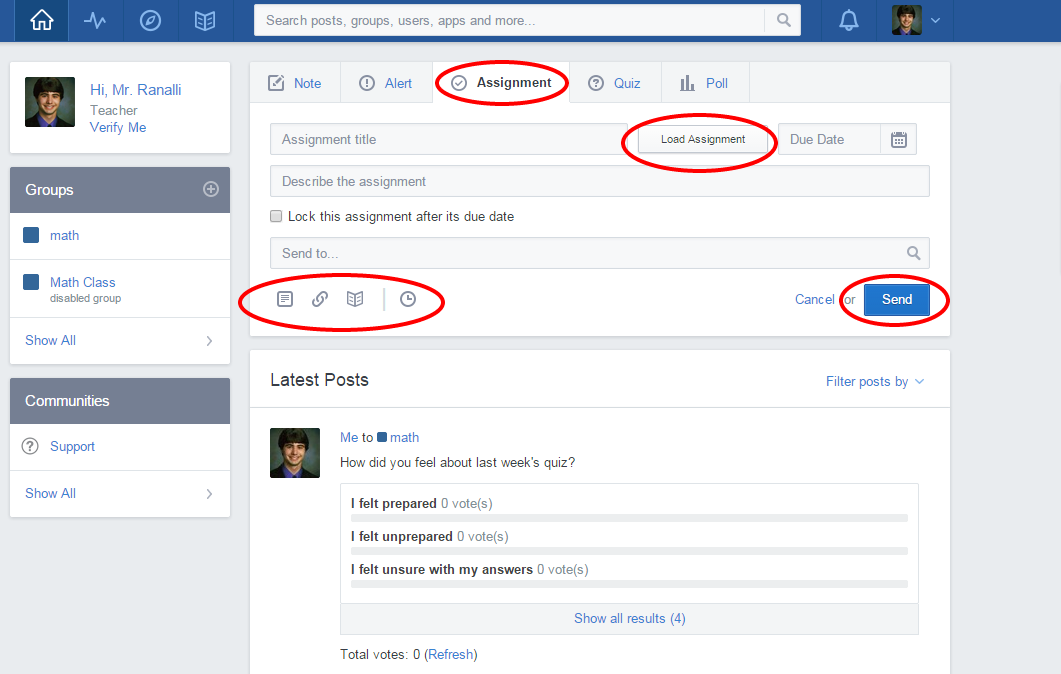
The final component is the assignment tool. This tool has a few extra steps which may look overwhelming at first, however once you learn each step on the tab it is a simple process to complete. Begin by clicking on the "assignment" tab, and type in the assessment title. Then you will need to click on the "load assignment" button to add any documents that contains the assignment. Once the assignment is loaded, choose a due date at the top right hand side by selecting a date from a calendar list. The forth step is to add a description of the assignment for the viewers to read prior to taking it and to select whether to lock the assignment once the date passes for students to post. The final three steps are to select the group or selected students to send the assignment to, post any hyperlinks or scheduled time, and then click on the "send" button.

That is everything for this week, if you have any questions or comments about these small yet important tools please leave it below. Thanks for reading and have a great rest of the week!


Alex

Friday, November 21, 2014

Using Edmodo to Create a Poll

Hi Everyone!

            This week will be a shorter post, however focused on a very useful tool within Edmodo. Below I have the step-by-step process with supplemental pictures of how to create a poll for your students to take in order to give you an idea of where your students are at, what to re-teach or where to move on to within a classroom setting. Polls in the classroom can be very useful for both students and teachers. They provide a quick tally of student opinions, thoughts or feelings about a specific topic and share them with one another. The teacher can use this information in order to re-teach information that they thought students did not get right away, or if the students feel very competent with the current information to allow the class to skip ahead and learn new content.  

Creating a poll is an easy four-step process. Step one is to click on the "poll" tab at the top of any page on the Edmodo site. A drop-down menu will appear allowing you to type in a question.


Once you do so the second step is to create a selection of answers that the students can choose from that will answer the question and help you as the teacher determine where to go next. You can post as many possible answers as you need. I used four answers as an example.


The next step is to choose who to send this poll to. You can send it to individual students, other teachers, or even whole class groups that you had created previously. Once you click on the groups or other contacts that you want to share with, click on the "send" button.


The final step is to open the page that you have your poll posted, to ensure that every question and answer is visible. Then you wait for your responses and view your results for future planning.


Good luck creating your own polls this week! I think this is a very fun and useful tool for a growing online classroom. As always please feel free to ask any questions or leave comments as you like.

Talk to you all next week!

Alex 


Thursday, November 13, 2014

Using Edmodo to Create a Quiz

Hello Everyone!

            Today as promised, I will be talking about how to create a quiz within Edmodo that your students can take after they had entered your class "group." In order to create a quiz you will need to follow an easy five step process. The Edmodo site itself lays out this process so it is very user-friendly. I have provided pictures of each step along with all of the possibilities that this site provides.

The first step of this process is to enter your Edmodo page, and click on the "group" that you had created for your class. In my situation, I used the demonstration group of Math. At the top of the page when you entered your group, you will notice a tab which says "Quiz." If you click on this tab a small box will pop up asking if you want to create or load a quiz. Click on "Create a Quiz"


A new page will open providing you will a selection of choices to begin the creation of your quiz format.
You can begin by creating a name, and time length that your students will have to complete the quiz, as well as what type of quiz you will be hosting, from a drop-down menu. The options that are available to you are: "multiple choice, fill in the blank, true or false, short answer and matching." Once you had decided on what type of question your first one will be click on "+ Add First Question. "  ***Note that you can have several different question types, you do not have to have only one option. I will explain more below***


Step three is where you will be able to create your questions at the top of the screen you will see several drop-down menus stating that you can use several different types of questions within your quiz. You can also change the point value! When creating the quiz question, you will have to place what the question is, into the question prompt box. Below that box is a secondary box to place the answer. ***As a side note the multiple choice option will require you to place several answers for a student to choose from.*** Once you finish each question click on the "Assign Quiz" button at the top right corner.

You will be brought back to your group page, where you will then have to click on the "Quiz" tab again. When you do, this time you should click on the "load a quiz" link and choose your newly formed quiz from the selections, and hit "send."


The final step for this process is to wait for your students to complete the quiz. You can view their progression and additional statistics from this page as well by clicking on the "turned in" button.

I hope you all enjoyed making a quiz! They can be easily reused by having the questions changed around from the quiz settings, an easy change when you click into the quiz. If you have any questions or comments about adding a quiz to your groups, please do not hesitate to ask!

Have a great rest of the week!

Alex


Thursday, November 6, 2014

Creating a Group - Edmodo

Hi Everyone!

            This week as I had mentioned I would be focusing on how to create a group in Edmodo. Let me first explain what a "group" means in Edmodo. What this term means is that you will have the ability to create an area designed specifically for a subject, where your students can join in order to get documents, as questions, take quizzes and more!

This process can be completed in about for short steps, similar to that of the log in. The first step to create a group for your class is to click on the add group link on the left-hand side of the page. A small window will pop up that will ask you to type in your group name, grade range, subject area, and the specific content that will be taught in that subject area.


The next step is to create a group size, this is the number of students that will be in your class, along with a description to explain what the group is about. This will also make the group easier for your students to find and add later on when they are prompted.

Once you have clicked on the "finish" button the group page will open, providing you with a group code that you will have to provide to your students in order to join your group.

Now that you have a group created, for your class you can utilize its tools in order to enhance your students' e-learning experience. Beginning with the use of communication, the group tool allows you the teacher or any of the students within the group to ask questions or make comments on the group's main page. This commenting tool allows for additional asynchronous communication between student to teacher, and students to student, after they had left the classroom. Additional tools as I had mentioned above consist of polling and quizzes that the students can take online in a location that might be more comfortable for them on their own time after school hours. 
This is also a good way to collect data from students, since all of the polling and quizzes are online, all of the information can be easily organized for later use. I will discuss more quizzes and polling tools later on during this blogging experience. Leave a comment below if you have any questions or problems when creating a group.

Have a great rest of the week all!

Alex

Friday, October 31, 2014

Creating an Edmodo Account!

Hello Everyone!

            This week has been very busy, but I wanted to make sure you all were able to learn how to create your own Edmodo account! The process in itself is only four steps, very easy and can be done within five minutes or less depending on how much information you put onto the site. I have outlines the steps below, however I must first discuss the importance of how to keep your online information safe with this site. As I had mentioned before this site is created to allow students and teacher only interact with one another within a single "group" called a classroom. Even though you as a teacher creates the group for only your students, I would suggest that both you and your students only put information that is required to create the account. This website tool is useful in many ways to help reach, and teach students outside of the classroom setting, and can utilize all of those functions without the requirement of important information.
            Now back to the fun stuff, below are the steps with pictures on how to create your own Edmodo account!

Step one: Go online to  www.edmodo.com. Once you are there begin your account creations by adding your email and password under a "Teacher" not student account. Then click on the "Sign Up for Free" button.


Step two: Find the school that you are teaching in! If it is unavailable, add it to their lists with the link at the bottom right hand side. Then click on "Next Step" button.
  

Step three: Provide your title, first and last name followed by the grade and content that you teach. You can even add a customized URL or add a picture at the bottom of this page, but it is not required. Then click on "Next Step" button.
  

Step four: Make sure all of the information is correct on the page and click on the "go to My Homepage" button on the bottom right hand side.


You will be taken to your homepage where you will then be able to explore the numerous possibilities! Next week I will discuss one of these tools that Edmodo offers. 


In the meantime, feel free to play around on your newly created site!

Cheers,

Alex

Tuesday, October 21, 2014

Second Blog Topic - Edmodo Introduction

Hello Everyone!

            As I the weeks continue, I will be shifting gears slightly from educational games to single topic of Edmodo. This topic is a type of social media and web-based learning tool in which teachers can use to connect with his or her students online after school hours. In simplest terms, this program is similar to Facebook, however only designed for a classroom setting. During my future blog posts, I will be discussing the different capabilities that this program provides to support the asynchronous communication between students and teachers after school hours as well as the web-based teaching tools that Edmodo also has available for teachers. Some tools include online tests/quizzes, online polls, discussion pages for question and answers provided by the teacher and/or students, and more.

This program is an easy access tool as teachers and students create their own page and join specific classrooms "groups". These classrooms are secure such that only students, parents and the teacher have access to any of the content or information that is placed on the page. Once the teacher has an understanding on the site, he or she can then teach his or her students how to use it. Since many students of the younger generation use the social media Facebook, typically on a daily basis, they can learn how to use this tool with ease. The best part about this web-based teaching and learning tool is that it is free to create an account; all you will need is an email address.   

https://www.edmodo.com/ 

Next week I will discuss how to create an account as well as a classroom.

Talk to you all then!

Alex


Wednesday, October 15, 2014

Critical Thinking and Problem Solving Skills - "Cut the Rope Experiments"

Hello Everyone! 

This week I was looking for a game that worked on skills and strategies, opposed to content based educational games. In my search, I found an application that is available for free on the Apple app store and Google Play store. I spent some time playing this game, and discovered that although does not present content in that would teach a concept to a student playing the game, (as I have been discussing in my previous posts), it does allow students to access and practice their critical thinking, and problem solving skills.
 
The name of this game is "Cut the Rope Experiments." Your job is to help the mad, (but good) scientist study this small creature named "Om Nom" that loves candy. Your mission in the game is to figure out how to strategically cut specific ropes, use bubbles, air devices and other instruments to drop a ball of candy into On Nom's mouth. The game has several levels, which you must obtain a certain about of stars or candy to move on, requiring players to play the game using their critical thinking and problem solving skills.

Although this might seem more of a simple "game" it can be used in classroom discussion by having students work in groups to come up with strategies to :
First - Get all the stars

Second - Avoid any challenges that might be added
Third - Determine the most efficient way to get the stars and collect the candy
Lastly - Give the candy to ON Nom.


The classroom discussions will help students develop their critical thinking and problem solving skills as they collaborate with one another to create the most effective solutions for getting the candy into Om Nom's mouth.

The use of cartoon characters and creative creatures will grab the attention of a student in a wide range from First or Second grade up to Eighth grade if not beyond. If you have a moment, take the time to download this game if you have an Apple or Android device, it is quite entertaining.

Have a great week,

Alex